
Certified Kubernetes Administrator CKA one stop simplified guide! - Part 1/10


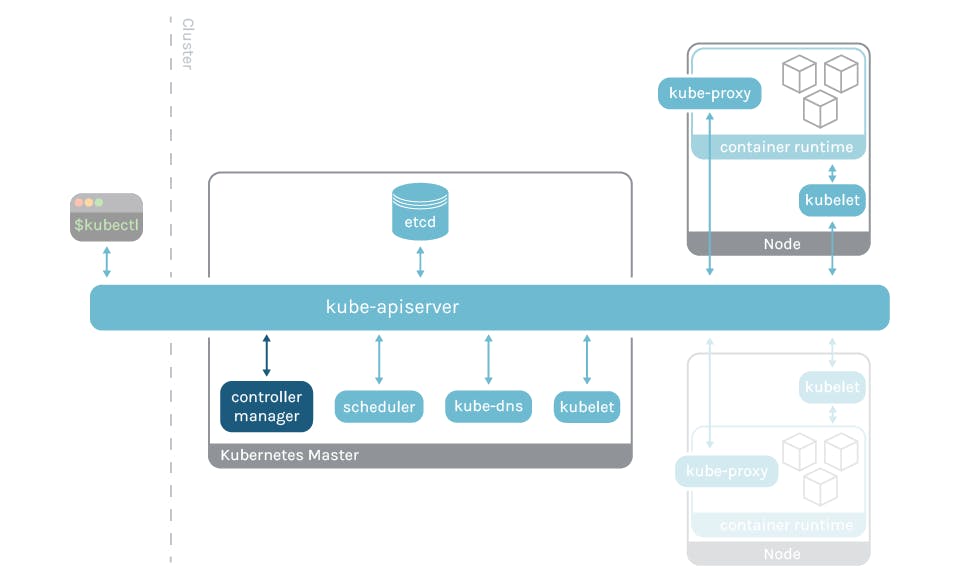
Kubernetes Architecture
Think of Kubernetes as a manager for your applications. It helps you deploy and manage your applications so they run smoothly and can scale up or down as needed. Let's break down the components and how they work together.
Basic Formula: Kubernetes Cluster = Control Plane (Master Node) + Nodes (Worker Node)
1. Control Plane/ Master Nod: This is like the brain of the Kubernetes cluster. It makes decisions about where to run your applications and how to keep them healthy. Control Plane includes the following:
API Server: Acts as the front-end for the control plane. It receives commands from users or automated systems and processes them.
etcd: A highly available key-value store that stores the cluster's configuration data. It helps keep track of all the nodes and their states.
Controller Manager: Monitors the state of your applications and takes actions to ensure they match your desired state. For example, if a pod goes down, the controller manager will start a new one.
Scheduler: Assigns pods to nodes based on resource availability and constraints. It makes sure your apps are distributed across the cluster.
2. Nodes (Worker Nodes): These are the worker machines where your applications actually run.
Kubelet: Manages and maintains individual nodes. It ensures that the containers inside the pods are running in a healthy state.
Kube Proxy: Maintains network rules on each node. It helps route traffic to the appropriate containers within pods.
Container Runtime: This is the software that runs containers (like Docker). It manages the creation, starting, stopping, and deletion of containers. ContainerD is a container runtime that manages the lifecycle of a container on a physical or virtual machine (a host).
3. Pods
4. Services
5. Labels and Selectors
6. ReplicaSets and Deployments
Here's a simple diagram to visualize how these components interact in a cluster:
Docker VS ContainerD
wip
ETCD
For Beginners
What is etcd?
- etcd is a distributed and reliable key-value store that is designed to be simple, secure, and fast. It's a tool that helps manage and store configuration data that various distributed systems, like Kubernetes, rely on.
What is a Key-Value Store?
- Imagine a traditional database like a spreadsheet with rows and columns. Key-value stores, on the other hand, are like dictionaries where you can associate values with keys. Each piece of data is stored as a key (like a word) with an associated value (like its definition). This structure is efficient for quick lookups and is useful for storing various types of information.
Getting Started with etcd:
Download the etcd Binary:
Go to the GitHub releases page for etcd.
Find the relevant binary for your operating system. For instance, to download etcd v3.5.6 for Linux, use this command in your terminal:
curl -LO https://github.com/etcd-io/etcd/releases/download/v3.5.6/etcd-v3.5.6-linux-amd64.tar.gz
Extract the Binary:
Use the following command to extract the downloaded binary:
tar xvzf etcd-v3.5.6-linux-amd64.tar.gz
Run the etcd Service:
Start the etcd service using the following command:
./etcdThis will make etcd listen on the default port 2379(default).
Operating etcd:
- The default client for etcd is
etcdctl, which is used to interact with the etcd key-value store.
Syntax for Storing a Key-Value Pair:
To store data in etcd, use the
putcommand. Replacekey1andvalue1with your desired key and value:./etcdctl put key1 value1
Syntax for Retrieving Data:
To retrieve data from etcd, use the
getcommand with the key you want to retrieve:./etcdctl get key1
Viewing More Commands:
If you want to explore more commands available in
etcdctl, simply runetcdctlwithout any arguments:./etcdctl
So, etcd is a powerful tool used to store configuration data for distributed systems. It operates as a key-value store, where data is stored in a key and value format. To get started with etcd, you 1. download the binary for your OS, 2. extract it, and 3. run the etcd service. The etcdctl command-line tool helps you store and retrieve key-value pairs, making it a crucial component for many distributed systems' configuration management.
ETCD in Kubernetes
ETCD Datastore:
ETCD is like the memory of your Kubernetes cluster. It stores essential information about the cluster, like Nodes, Pods, Configurations, Secrets, and more.
Everything you see when you use
kubectl getcommands comes from the ETCD Server.
Setting Up ETCD - Manual:
If you're building your cluster from scratch:
You download the ETCD software.
Configure it as a service on your master node.
It's like setting up a toolbox yourself.
Setting Up ETCD - Kubeadm:
If you're using
kubeadmto build your cluster:kubeadmhandles the ETCD setup.ETCD runs as a pod in the
kube-systemnamespace.It's like having someone else set up and organize your toolbox for you.
Exploring ETCD:
You can peek into ETCD using commands.
To list all the keys (information) stored by Kubernetes:
kubectl exec etcd-master -n kube-system -- sh -c "ETCDCTL_API=3 etcdctl --cert=/etc/kubernetes/pki/etcd/server.crt --key=/etc/kubernetes/pki/etcd/server.key --cacert=/etc/kubernetes/pki/etcd/ca.crt get / --prefix --keys-only"Think of Kubernetes storing its data in a well-organized folder structure. It's like a filing cabinet with labeled drawers where each drawer holds different things, such as nodes, pods, deployments, and more.
Kubernetes Stores data in a specific directory structure, the root directory is the
registryand under that you have varies kubernetes constructs such asminions,nodes,pods,replicasets,deployments,roles,secretsandOthers.
ETCD in High Availability (HA) Environment:
In a setup with multiple master nodes for high availability:
You'll have multiple copies of ETCD on these nodes.
These ETCD instances communicate with each other.
They ensure all the copies stay updated and in sync.
Make sure etcd instances know each other by setting the right parameter in the
etcd.serviceconfiguration. The--initial-clusteroption where you need to specify the different instances of the etcd service.
In Simple Words: ETCD is like the brain of you5r Kubernetes cluster. It keeps important information organized and safe, such as what's in your cluster, who's doing what, and where things are. Setting up ETCD can be done manually, like assembling a toolkit, or automatically using kubeadm, which arranges the tools for you. It's important for a stable and healthy cluster, especially in setups where there are multiple master nodes. Just imagine it as the quiet, organized hub where all the cluster's details are stored.
ETCD - Commands
ETCDCTL Utility and API Versions:
What is ETCDCTL?
- ETCDCTL is a command-line tool used to interact with ETCD, the key-value store in Kubernetes.
API Versions in ETCDCTL:
ETCDCTL can communicate with the ETCD Server using two API versions: Version 2 and Version 3.
Each version has its own set of commands.
Example of ETCDCTL Version 2 Commands:
Version 2 commands include things like backups, cluster health checks, creating keys, making directories, and setting values.
          etcdctl backup
          etcdctl cluster-health
          etcdctl mk
          etcdctl mkdir
          etcdctl set
Example of ETCDCTL Version 3 Commands:
Version 3 commands are different and include actions like saving snapshots, checking endpoint health, retrieving keys, and setting values.
          etcdctl snapshot save
          etcdctl endpoint health
          etcdctl get
          etcdctl put
Setting the Right API Version:
To use a specific API version, set the
ETCDCTL_APIenvironment variable.For Version 3, use this command:
export ETCDCTL_API=3
Certificates for Authentication:
ETCDCTL needs certificates to authenticate with the ETCD API Server.
These certificates are stored in the etcd-master directory:
--cacert /etc/kubernetes/pki/etcd/ca.crt--cert /etc/kubernetes/pki/etcd/server.crt--key /etc/kubernetes/pki/etcd/server.key
Putting It All Together:
To run commands, make sure to:
Set the desired API version using
ETCDCTL_API.Specify the path to certificate files for authentication.
Example Command:
Here's how a command to retrieve keys might look:
kubectl exec etcd-controlplane -n kube-system -- sh -c "ETCDCTL_API=3 etcdctl get / --prefix --keys-only --limit=10 --cacert /etc/kubernetes/pki/etcd/ca.crt --cert /etc/kubernetes/pki/etcd/server.crt --key /etc/kubernetes/pki/etcd/server.key"
In simple terms, ETCDCTL is a tool for talking to ETCD. It can speak two different languages: API Version 2 and Version 3, each with its own set of commands. To use a specific version, you set ETCDCTL_API. And, to authenticate, ETCDCTL needs certificates that are stored in specific paths. So, when you're running ETCDCTL commands, remember to specify the right API version and the paths to the certificate files.
KubeAPI Server
Introduction:
Kube-apiserver is the most important component in Kubernetes.
It's like the captain of the ship, making decisions and handling requests.
Responsibilities:
Authenticating and Validating: Kube-apiserver makes sure requests to the cluster are coming from legitimate sources and that they're valid.
Data Handling: It reads, writes, and updates data in the ETCD key-value store.
Direct Interaction with ETCD: Kube-apiserver is the only component that directly interacts with ETCD. Other components like kube-scheduler, kube-controller-manager, and kubelet use Kube-apiserver to update the cluster.
Installing kube-apiserver:
If you're using
kubeadmto set up, you don't need to worry about this. It's handled for you.If you're setting up manually, you can download kube-apiserver binary from Kubernetes release page.
For instance, to download v1.13.0:
wget https://storage.googleapis.com/kubernetes-release/release/v1.13.0/bin/linux/amd64/kube-apiserver
Viewing kube-apiserver - Kubeadm:
kubeadmsets up kube-apiserver as a pod in thekube-systemnamespace on the master node.You can view the pods:
kubectl get pods -n kube-system
Viewing kube-apiserver Options - Kubeadm:
- The options for kube-apiserver can be seen in the pod definition file located at
/etc/kubernetes/manifests/kube-apiserver.yaml.
Viewing kube-apiserver Options - Manual Setup:
In a non-kubeadm setup, you can inspect the options by looking at the kube-apiserver.service file:
cat /etc/systemd/system/kube-apiserver.service
Seeing Running Process and Options:
To see the running kube-apiserver process and its effective options:
ps -aux | grep kube-apiserver
In Simple Terms: Kube-apiserver is like the control center of Kubernetes. It checks who's allowed to do what, stores and retrieves important data, and talks directly to the ETCD storage. When you set up Kubernetes using kubeadm, kube-apiserver is automatically managed. It's represented as a pod on the master node and has various options that define its behavior. If you're doing things manually, you can find the options in specific files. So, it's the top decision-maker and communicator in the Kubernetes world.
Kube Control Manager
Introduction:
Kube Controller Manager is a crucial component in Kubernetes Control Plane
Its primary responsibility is to manage various controllers within the Kubernetes cluster.
What are Controllers?
In Kubernetes, a controller is a process that continually monitors the state of components and works to achieve the desired system state.
Controllers ensure that the cluster remains in the expected working condition.
Types of Controllers:
Node Controller:
Monitors the state of nodes (machines) in the cluster.
Takes actions to keep applications running on healthy nodes.
Replication Controller:
Monitors replica sets' status.
Ensures the desired number of pods are always available within a replica set.
Other Controllers:
- Kubernetes has many more controllers that perform specific tasks to maintain the desired state of the cluster.
Installing Kube-Controller-Manager:
Installing kube-controller-manager automatically installs various controllers as well.
You can download the kube-controller-manager binary from the Kubernetes release page.
For example, to get v1.13.0:
wget https://storage.googleapis.com/kubernetes-release/release/v1.13.0/bin/linux/amd64/kube-controller-manager
Controlling Enabled Controllers:
By default, all controllers are enabled in kube-controller-manager.
You can choose to enable specific controllers by configuring
kube-controller-manager.service.
Viewing kube-controller-manager - Kubeadm:
kubeadmsets up kube-controller-manager as a pod in thekube-systemnamespace.To see the pods:
kubectl get pods -n kube-system
Viewing kube-controller-manager Options - Kubeadm:
- The options for kube-controller-manager are in the pod definition file located at
/etc/kubernetes/manifests/kube-controller-manager.yaml.
Viewing kube-controller-manager Options - Manual Setup:
In a non-kubeadm setup, you can inspect the options by looking at the
kube-controller-manager.servicefile:cat /etc/systemd/system/kube-controller-manager.service
Seeing Running Process and Options:
To view the running kube-controller-manager process and its effective options:
ps -aux | grep kube-controller-manager
In Simple Terms: Kube Controller Manager is the manager of managers in Kubernetes. It looks after various controllers that ensure the cluster stays healthy. Think of controllers as specialized caretakers, each responsible for a specific task like keeping nodes in shape or maintaining the right number of pods. When you set up Kubernetes, kube-controller-manager takes care of installing the right controllers. If you want to tweak things, you can adjust the options. And just like other components, you can find the kube-controller-manager process and see its options in specific files or by using commands.
Kube Scheduler
Introduction:
kube-scheduler is responsible for scheduling pods on nodes.
Its main role is to schedule pods onto nodes within the cluster.
Scheduling Pods:
Kube-Scheduler is responsible for only deciding which pod should be placed on which node.
However, it doesn't carry out the placement; that's the job of the kubelet.
Importance of a Scheduler:
Scheduling is vital in Kubernetes because it helps efficiently allocate resources and distribute workloads across the cluster.
Without a scheduler, we'd have to manually decide where each pod should run, which isn't practical in dynamic environments.
Manual Installation of Kube-Scheduler:
To install kube-scheduler manually:
Download the kube-scheduler binary from the Kubernetes release page.
For example, to get v1.13.0:
wget https://storage.googleapis.com/kubernetes-release/release/v1.13.0/bin/linux/amd64/kube-schedulerExtract it and run it as a service.
Viewing kube-scheduler Options - Kubeadm:
If you set up Kubernetes with
kubeadm, it deploys kube-scheduler as a pod in thekube-systemnamespace on the master node.To see the pods:
kubectl get pods -n kube-systemYou can find the options for kube-scheduler in the pod definition file located at
/etc/kubernetes/manifests/kube-scheduler.yaml.
Seeing Running Process and Options:
To view the running kube-scheduler process and its effective options:
ps -aux | grep kube-scheduler
In Layman's Terms: Think of kube-scheduler as the matchmaker of Kubernetes. When you want to place a pod on a node, kube-scheduler helps you choose the perfect match. It doesn't physically place the pod, though—that's the job of the kubelet. This matchmaking is crucial for a smooth and efficient cluster. Imagine trying to assign tasks to workers in a large team—you'd want to assign the right tasks to the right people. Similarly, kube-scheduler ensures that pods find the best nodes to work on. It can do this automatically, so you don't have to worry about manual assignments. If you set up Kubernetes with kubeadm, kube-scheduler is managed as a pod in the kube-system area. You can tweak its options to fine-tune its matchmaking skills. You can also peek at its activities by checking the running process and its settings.
Kubelet
Introduction:
Kubelet is the primary point of contact for the kubernetes cluster
Kubelet's Role:
Kubelet has the responsibility of creating pods on nodes (machines) in the cluster.
Unlike the scheduler, which decides where pods go, Kubelet physically creates them.
Kubelet's Importance:
Kubelet ensures that the containers described in the pod specifications are up and running on the nodes as expected.
It performs tasks like pulling container images, starting and stopping containers, and monitoring their health.
Manual Installation of Kubelet:
Unlike some other components, kubeadm doesn't deploy kubelet by default.
You need to download and install it manually:
Download the kubelet binary from the Kubernetes release page.
For instance, to get v1.13.0:
wget https://storage.googleapis.com/kubernetes-release/release/v1.13.0/bin/linux/amd64/kubeletExtract it and run it as a service.
Viewing Kubelet Options:
To view the running kubelet process and its effective options on a worker node:
ps -aux | grep kubelet
Simplified Explanation: Think of kubelet as the hands-on caretaker of each node in your Kubernetes neighborhood. When a pod needs a place to stay, kubelet prepares the room (container) for it, makes sure it's clean (image pulled), and ensures it's comfortable (container running). Kubelet is the bridge between the master and the node—it communicates what the master wants to the node. So, while the scheduler helps choose the right home (node) for each pod, kubelet is the one that actually prepares and maintains that home. To get kubelet on the team, you'll need to manually add it—download it, set it up, and let it do its job. If you want to peek at its activities, just look at the running process and its settings on a worker node.
Kube Proxy
Introduction:
- Kube Proxy is responsible for managing network connectivity among pods within the cluster.
Network Connectivity:
In a Kubernetes cluster, every pod needs to communicate with every other pod seamlessly.
Kube-Proxy ensures this connectivity by setting up networking rules and routes.
Role of Kube-Proxy:
It enables the pods to discover and connect with each other by handling the network traffic routing.
It supports load balancing for services and maintains IP tables or other network modes.
Manual Installation of Kube-Proxy:
To install kube-proxy manually:
Download the kube-proxy binary from the Kubernetes release page.
For example, to get v1.13.0:
wget https://storage.googleapis.com/kubernetes-release/release/v1.13.0/bin/linux/amd64/kube-proxyExtract it and run it as a service.
Viewing Kube-Proxy Options - Kubeadm:
If you set up Kubernetes with kubeadm, it deploys kube-proxy as a pod in the
kube-systemnamespace.In fact, kube-proxy is deployed as a daemonset on each node.
To see the pods:
kubectl get pods -n kube-system
Layman's Perspective: Think of kube-proxy as the traffic director in your Kubernetes neighborhood. When a pod wants to talk to another pod, kube-proxy helps set up the conversation—they exchange messages smoothly. Kube-proxy ensures that every pod is reachable, almost like neighbors borrowing sugar from each other. Kube-proxy is like a helpful guide that points out the best routes for pods to chat. To bring kube-proxy onto the scene, you'll need to invite it—download it, get it ready, and let it manage the communication dance. If you set up Kubernetes with kubeadm, kube-proxy acts as a pod in the kube-system area, making sure everyone's connected.
Here you will need basic Kubernetes Knowledge of the following topics:
Pods
YAML in Kubernetes
Replicaset
Deployments
Services
I have also covered these topics in a simplified way for beginners in my previous blog here
YAML in Kubernetes
When working with Kubernetes, we use YAML files to define the objects we want to create, like Pods, Replicas, Deployments, and Services. These YAML files always have four main parts at the top level.
apiVersion: This tells Kubernetes which version of its API we are using. Depending on what we want to create (e.g., Pods), we need to set the appropriateapiVersion. For Pods, it's usually set tov1.kind: This indicates the type of object we want to create, such as Pod, ReplicaSet, Deployment, or Service. For a Pod, we set it asPod.metadata: This section contains data about the object, like its name and labels. The name is a simple string, and labels are like tags that help us identify and group objects later.spec: This is where we provide additional information to Kubernetes about the object we want to create. For example, for a Pod, we specify the container details like its name and the image it should use.
When writing the YAML file, it's essential to keep the proper indentation for the properties. For example, name and labels should be indented a bit under metadata, so they are considered as children of metadata. The same applies to properties under spec.
Once we have written the YAML file, we can create the object using the kubectl create -f <filename> command.
Remember the four main properties: apiVersion, kind, metadata, and spec, and fill in the necessary information based on the type of object you want to create.