Certified Kubernetes Administrator CKA one stop simplified guide! - Part 2/10


Index
-
-
- Labels and Selectors
Deployment
- Rollouts and Updates
Networking In Kubernetes
Services
NodePort
ClusterIP
Load Balancer
Concept of Endpoints in Services
Learn by doing
Certification Tips
Namespaces
Imperative vs Declarative Commands
List of useful Imperative Commands
There are 4 Basic Objects in Kubernetes:
Pods → smallest unit; stores container
Replicaset / Replication Controller → instances of Pod; to reduce load
Deployments → to manage updates, rollbacks
Services → enable communication bw application and users or different parts of the application
Pods
In Kubernetes, the ultimate goal is to deploy applications in the form of containers on worker nodes within a cluster. However, Kubernetes doesn't directly deploy containers on worker nodes. Instead, containers are encapsulated into Kubernetes objects called "PODs." A POD is the smallest unit you can create in Kubernetes and represents a single instance of an application.
When you need to scale your application to handle more users, you don't add additional instances of your web application within the same POD. Instead, you create new PODs, each containing a new instance of the same application. So if you initially had a single-node Kubernetes cluster with one instance of your application running in a single Docker container encapsulated in a POD, you can add more PODs on the same node to share the increased load.
But if your user base continues to grow, and your current node doesn't have sufficient capacity, you can expand the cluster's physical capacity by adding new nodes. Each new node in the cluster can accommodate additional PODs, allowing you to further scale your application.
In summary:
PODs have a one-to-one relationship with containers running your application.
To scale up, you create new PODs with new instances of your application.
To scale down, you delete unnecessary PODs.
You do not add additional containers to an existing POD to scale your application.
Learn from an Example
While it is technically possible to directly deploy individual containers on a Kubernetes cluster without using Pods, doing so is not a recommended practice. The primary reason for using Pods in Kubernetes is to group related containers together and provide a higher-level abstraction for managing them as a single unit. Deploying individual containers without Pods can lead to several challenges and limitations, which can be better addressed by using Pods. Let me explain with an example:
Let's say you have an application that consists of ten containers, each serving different functions:
Frontend web server (container 1)
Backend API server (container 2)
Database server (container 3)
Cache server (container 4)
Worker for background tasks (container 5)
Monitoring agent (container 6)
Log collection agent (container 7)
Analytics service (container 8)
Email service (container 9)
File storage service (container 10)
If you directly deploy these ten containers on the Kubernetes cluster without using Pods, you would face several issues:
Network Communication: The containers wouldn't have a straightforward way to communicate with each other. Each container would have its IP address, and managing the network setup to enable communication between them would be cumbersome.
Resource Management: Each container would have its resource requirements and limits, but Kubernetes would not have a way to manage and allocate resources at a higher level. You would need to manually manage resource allocation for each container.
Scaling and Replication: If you need to scale the application or replicate specific containers, you would have to handle the scaling and replication logic manually for each container.
Health Monitoring and Restart: Kubernetes provides built-in health monitoring and auto-restart capabilities for Pods. Without Pods, you would need to manage the health checks and restarts of each container independently.
Deployment Strategy: With separate containers, you would need to define the deployment strategy for each container individually, which would lead to a more complex and error-prone setup.
Service Discovery: Managing service discovery for each container separately would be difficult. Pods come with a built-in DNS that allows easy communication between containers.
By using Pods, you can group the related containers together as a single logical unit:
apiVersion: v1
kind: Pod
metadata:
  name: my-app
spec:
  containers:
    - name: frontend-web-server
      image: frontend-web-image:latest
      # ...
    - name: backend-api-server
      image: backend-api-image:latest
      # ...
    # ... and so on for the other containers
This way, you can manage all ten containers as one Pod. Kubernetes will handle the networking, resource management, scaling, health monitoring, and service discovery for the entire Pod, simplifying the management and operations of your application.
Multi Container Pods
In Kubernetes, a Pod is the smallest deployable unit and represents one or more tightly coupled containers running together on the same worker node. While Pods usually have a one-to-one relationship with containers (one container per Pod), they can also have multiple containers, but this is less common. Let's understand why we might have multiple containers in a Pod:
Scenario 1: Scaling with Helper Container Imagine you have a web application container (App Container) that handles user requests, and you also have a supporting container (Helper Container) that processes data uploaded by users. To manage the two containers together and ensure they live and die together, you can place them in the same Pod:
apiVersion: v1
kind: Pod
metadata:
  name: my-app-pod
spec:
  containers:
    - name: app-container
      image: my-webapp-image:latest
      # ...
    - name: helper-container
      image: my-helper-image:latest
      # ...
In this case, whenever you create a new Pod for your application, both the App Container and the Helper Container are created together, and when the Pod is deleted, both containers are deleted.
Scenario 2: Simple Docker Containers vs. Kubernetes Pods Suppose you have a simple application that you want to deploy using Docker on a single host. Initially, you just run the container using the docker run command:
docker run -d --name my-app-container my-webapp-image:latest
If you later need a helper container to support your application, you can run it separately:
docker run -d --name my-helper-container my-helper-image:latest
Now, you need to manage the connection between these containers, set up custom networks, and ensure that they share the same storage. Also, if the application container fails, you need to manually handle the helper container's termination.
However, in Kubernetes, you can use a Pod to manage both containers together:
apiVersion: v1
kind: Pod
metadata:
  name: my-app-pod
spec:
  containers:
    - name: app-container
      image: my-webapp-image:latest
      # ...
    - name: helper-container
      image: my-helper-image:latest
      # ...
Kubernetes automatically takes care of network connectivity, shared storage, and lifecycle management. If you scale the application, Kubernetes will create new Pods with both containers together.
In conclusion, while Kubernetes allows for multi-container Pods, it's less common. Usually, one container per Pod is preferred for simplicity and maintainability. By using Pods, Kubernetes abstracts away the complexities of container management and enables efficient scaling, network handling, and resource sharing for your application.
Replica Set or Replication Controller
A "replica" in Kubernetes is a copy of a Pod. So, if we have a single Pod running our application, and it fails for any reason, users won't be able to access the application anymore. To ensure high availability, we want to make sure that a specific no. of Pod are running at all time. That's where the Replication Controller comes in. It helps us maintain a specified number of replicas (copies) of a Pod at all times. So, even if one pod fails, replication controller makes sure another wakes up to continue serving the application.
The Replication Controller is useful not only for multiple replicas but also for a single Pod. If we have a single Pod, the Replication Controller can automatically bring up a new Pod if the existing one fails, ensuring that the application remains available.
The Replication Controller is also handy for load balancing. When the number of users accessing our application increases, we can deploy more replicas of the Pod to balance the load across them. This way, we can efficiently utilize resources and handle increased demand.
There are two similar terms, Replication Controller and Replica Set. They serve the same purpose, but Replica Set is the newer technology that replaces Replication Controller. However, most of what we learned about Replication Controller still applies to Replica Sets.
To create a Replication Controller or a Replica Set, we write a definition file as usual in YAML format. The file contains four main sections: apiVersion, kind, metadata, and spec. The apiVersion and kind specify the type of controller we are creating, and metadata contains information like the name and labels for the controller. The spec section defines what the controller will manage, such as the number of replicas (Pods) and the template for the Pods.
Replica Set requires an additional section called selector. This helps the Replica Set identify which Pods fall under its management. It ensures that even existing Pods that match the specified labels will be taken into consideration by the Replica Set.
In summary, both Replication Controller and Replica Set help us manage the number of Pod replicas and provide high availability, load balancing, and automatic recovery features. Replica Set is the preferred choice now, but both work similarly for the most part.
Labels and Selectors
Labels and Selectors are a way to group and identify objects (like Pods) in Kubernetes. They are like tags that we attach to our objects to organize and manage them better.
Here's why we use Labels:
Grouping: Labels help us group related objects together. For example, we can label all the Pods belonging to a frontend application with a label like "app=frontend" and all the Pods of a backend application with "app=backend". This way, we can easily manage and filter these objects based on their labels.
Filtering: Selectors use Labels to filter and identify which objects a controller should manage. For instance, a Replica Set or Replication Controller uses a Selector to find the Pods it needs to monitor. By matching the Labels specified in the Selector with the Labels of existing Pods, the controller knows which Pods to keep an eye on.
Scaling and High Availability: Labels also play a role in scaling and ensuring high availability. When we need more replicas of a Pod (for load balancing or fault tolerance), we can create a Replica Set or Replication Controller with the proper Selector and the desired number of replicas. The controller will automatically manage and maintain the specified number of Pods based on their Labels.
When we create a Replica Set or Replication Controller, we define a template for the Pods it will manage. Even if we already have existing Pods, the template is still needed because it provides the blueprint for creating new Pods if any of the existing ones fail.
Imp: To scale a Replica Set, we can either update the replicas field in the Replica Set definition file and use kubectl replace, or we can use kubectl scale to directly set the desired number of replicas without modifying the file.
Why do we need a Selector when we already have a Template?
Template: The Template section defines the blueprint or the specification of the Pods that the Replica Set or Replication Controller should manage. It provides the necessary information to create new Pods or replicas when needed. The Template includes details like the container image, resource limits, environment variables, etc. The Template is crucial because it defines what the managed Pods should look like. And the other one : Selector: The Selector is used by the Replica Set or Replication Controller to identify which existing Pods it should monitor and manage. It acts as a filter to determine which Pods fall under its control. When you create a Replica Set or Replication Controller, it needs to know which Pods are part of the set it manages. The Selector allows it to find and keep track of these Pods.Deployment
Imagine you have an application that needs to run in a production environment. You don't just need one copy of the web server; you need multiple copies for better performance and to handle user requests efficiently.
Now, let's say you made an update in the application, and you want to push this new version with updates in all other copies too that is you'd want to upgrade all other instances of your app seamlessly and without causing any interruption for users. This upgrade should be done in a controlled manner, so you obviously won't upgrade all instances at once, because this will cause downtime. Instead, you'd prefer to upgrade them one after the other, so that at any point of time, if one copy is getting upgraded, there exists another copy that can take user requests! This kind of upgrade is known as "Rolling Updates."
But what if one of the upgrades goes wrong, and you need to revert to the previous version quickly? You'd want the ability to undo the recent update and roll back to the stable version. This is crucial to maintain the reliability of your application.
Or sometimes, let's say for example there is a huge bug in your application effecting user's privacy and you will want to actually stop all the apps, pause your environment, fix that bug in all your apps(instances of your apps) together, and then resume, ensuring all changes are rolled-out together. This is also called as Recreate Strategy. This may result in a downtime, but for this scenario, it was worth it!
And you see how we are upgrading or pods(apps/instances) seamlessly using strategies like Rolling Updates or Recreate! And how is this happening? Using Kubernetes Deployments! Deployments are a Kubernetes object that provides powerful capabilities for managing your application updates and changes.
Here's how Deployments work:
Creation: To create a Deployment, you write a Deployment definition file (in YAML format). It looks similar to the Replica Set definition file but with the kind set as "Deployment."
Seamless Upgrades: Deployments allow you to perform Rolling Updates, ensuring that new versions of your application are gradually rolled out to instances one by one. This prevents disruptions and allows you to monitor the application's health during the update.
Rollback: If any issues occur during the update, you can easily roll back to the previous stable version with a single command. How reliable!
Pause and Resume: You can pause a Deployment, make multiple changes (like upgrades, scaling, resource adjustments), and then resume it. All changes will be applied together.
It also creates a Automatic Replica Set: When you create a Deployment, it automatically creates a Replica Set, which then manages the creation and scaling of Pods.
By using Deployments, you gain more control over your application's lifecycle, ensuring smooth upgrades, quick rollbacks, and coordinated changes across your environment. Deployments are a higher-level abstraction that helps manage your application effectively in a production environment.
Rollouts and Updates
Kubernetes Deployments are used to manage applications in a production environment. When you create a Deployment or upgrade your application's images, it triggers a process called a "Rollout." A Rollout is the gradual deployment or upgrade of your application's containers.
When you create a new Deployment, it creates a new revision of that Deployment. For example, let's call it "Revision 1." If you later upgrade your application, a new revision is created, let's say "Revision 2." This way, you can keep track of changes made to your Deployment, and if necessary, you can easily rollback to a previous version.
There are two types of Deployment strategies:
Recreate Strategy: This strategy destroys all existing instances of your application and creates new instances with the updated version. It results in downtime during the upgrade, as the application is inaccessible until the new instances are up.
RollingUpdate Strategy: This strategy updates your application gradually, one instance at a time. It takes down the older version and brings up the newer version sequentially, ensuring your application remains accessible and the upgrade is seamless. This is the default strategy for Deployments.
To perform an upgrade, you can either modify the Deployment definition file with the changes you want and apply it using the kubectl apply command, or you can use kubectl set image to update the container image directly. Be careful when using the latter (imperative) approach, as it may result in a different configuration in the Deployment definition file.
If something goes wrong with the upgrade, Kubernetes Deployments allow you to rollback to the previous version using the kubectl rollout undo command. This undoes the change and brings back the older version of the application.
When a Deployment is created, Kubernetes automatically creates a ReplicaSet, which manages the creation and scaling of Pods. During an upgrade, Kubernetes creates a new ReplicaSet for the newer version while gradually taking down Pods in the old ReplicaSet.
Lastly, you can use the kubectl run command to create a Deployment by specifying just the image name, but it's recommended to use a definition file for better management and version control.
Again, Deployments in Kubernetes help you manage application upgrades, track revisions, perform rollbacks, and ensure a smooth and continuous deployment process for your applications.
Deployment Definition file for Deploy
apiVersion
kind: Deployment
metadata
name
labels
spec
replicas
selector
template
Networking in Kubernetes
In Kubernetes, each application or service runs inside a "Pod," which is like a small container. Unlike Docker world where each Docker container is assigned an IP address, in Kubernetes each Pod gets its own unique IP address so it can communicate with other Pods.
In a single-node Kubernetes setup, everything is straightforward. Each Pod gets an IP, and they can talk to each other easily.
But in a multi-node setup, there are multiple servers (nodes), each with their own IPs. Now, we face a problem. If Pods on different nodes have the same IP addresses, they can't talk to each other because that would cause conflicts.
To solve this problem, Kubernetes uses a "Networking Solution" that assigns unique IP addresses to each Pod, regardless of which node they are on. This solution makes sure all Pods can communicate properly.
There are different Networking Solutions available, like Calico, Flannel, and others. Depending on your setup and needs, you can choose one of these solutions to make sure your Pods can talk to each other, no matter where they are in the Kubernetes cluster.
Services
Kubernetes Services are like virtual entities that enable communication between different parts of an application or between applications and users. They help connect various components, like front-end and back-end servers, and even external data sources. This makes it easier for different parts of the application to work together without being tightly coupled.
Let's say you have an application running on Kubernetes, and it consists of several small parts called PODs. These PODs are like small units of the application. Now, if you want to access the application from your laptop, you can't directly connect to the individual POD because they are in a separate network.
Here's where Kubernetes Services come in. They act as middlemen between your laptop and the PODs, allowing you to access the application without having to SSH into the Kubernetes node. Let's understand types of Services (based on how they communicate):
There are overall three types of services in Kubernetes
NodePort
Cluster IP
Loadbalancer
NodePort
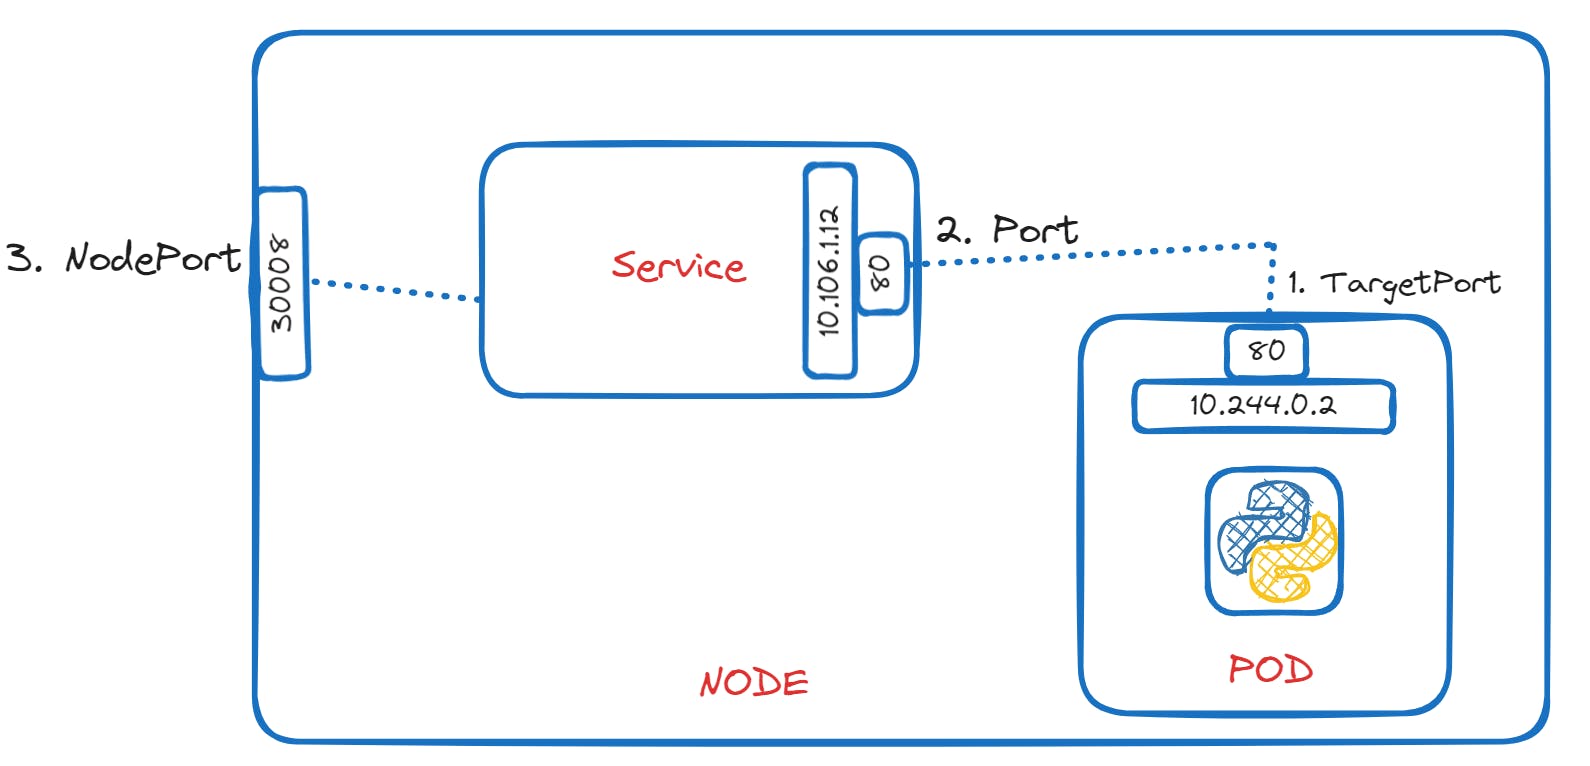
One type of service is called "NodePort." It listens on a specific port on the Kubernetes node and forwards requests to a corresponding port on the PODs. So, when you make a request to the node's IP and the designated port (NodePort), the service takes care of routing the request to the appropriate POD running the application.
To create a NodePort service, you need to define it in a configuration file, similar to how you define other Kubernetes objects. You specify the target port (the port on the POD where the web server runs), the service's own port, and the NodePort (the port on the Kubernetes node through which external users can access the service).
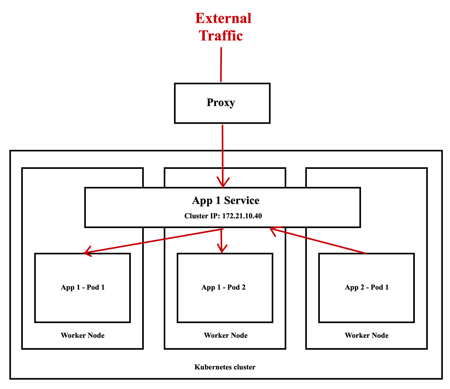
If you have multiple PODs running the same web application for high availability or load balancing, the service automatically selects all these PODs as endpoints to handle incoming requests. It acts as a built-in load balancer, distributing the load across all the available PODs.
Additionally, whether your PODs are on a single node or spread across multiple nodes, the service adapts automatically, and you can access your application using any node's IP and the same NodePort.
Kubernetes Services enable communication between different parts of your application and provide a simple way for external users to access your services without worrying about the underlying infrastructure details. They are flexible, adaptable, and a key component in building scalable and reliable applications on Kubernetes.
Service Definition File for NodePort Service
Sections included:
apiVersion
kind
metadata
spec
type: NodePort
ports
targetPort (POD Port)
port (Service Port)
node port (Node Port)
selector
app
labels
Example:
apiVersion: v1
kind: Service
metadata:
  name: my-app-service
spec:
  type: NodePort
  ports:
    - targetPort: 80
      port: 80
      nodePort: 30008
Cluster IP
In a full-stack web application running on Kubernetes, different parts of the application are hosted on separate units called PODs. For example, there are front-end PODs, back-end PODs, Redis PODs, and database PODs. These PODs need to communicate with each other to make the application work.
However, the IP addresses assigned to these PODs are not static and can change. So, we can't rely on these IP addresses for communication within the application. Also, when a front-end POD wants to connect to a back-end service, it might not know which back-end POD to choose.
This is where Kubernetes Services come in handy. Service groups together related PODs and provides a single interface to access them. For example, a Service can group all the back-end PODs together, and other PODs can access this back-end Service without worrying about which specific back-end POD to connect to. The requests are randomly forwarded to one of the back-end PODs under the Service.
To create such a Service, we define it in a configuration file. We specify the type of Service as "ClusterIP," which is the default type for Services. We also specify the targetPort (the port on which the back-end is exposed) and the port (the port on which the Service is exposed). We link the Service to a set of PODs using labels, so the Service knows which PODs to include.
Once the Service is created, it gets an IP address and a name assigned to it inside the Kubernetes cluster. Other PODs can now access this Service using its ClusterIP or name, making communication between different parts of the application easier and more scalable.
In summary, Kubernetes Services help in organizing and connecting different parts of a microservices-based application, allowing them to communicate effectively without worrying about changing IP addresses or specific POD selections. They make it easier to build and manage complex applications on a Kubernetes cluster.
Service Definition File for ClusterIP Service
Sections included:
apiVersion
kind
metadata
spec
type: ClusterIP
ports
targetPort (POD Port)
port (Service Port)
selector
- labels
apiVersion: v1
kind: Service
metadata:
    name: back-end
spec:
    type: ClusterIP
    ports:
        - targetPort: 80
          port: 80
    selector:
        app: myapp
        type: back-end
LoadBalancer
Let's simply understand this step by step:
Recap of ClusterIP and NodePort: In a Kubernetes cluster, we have different services to make different parts of our application available. The "ClusterIP" service type makes services available internally within the cluster. The "NodePort" service type exposes the application on a high port of the nodes, allowing users to access the application using any node's IP with a specific port number.
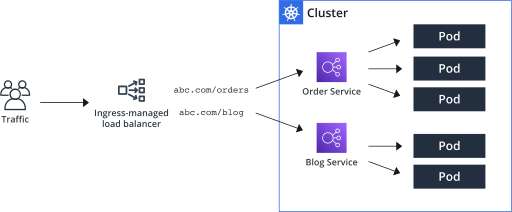
Need for Load Balancer: When we have multiple nodes in the Kubernetes cluster, we don't want to give end users separate IPs of each node to access the application. Instead, we want to provide a single URL for them to access the application, like http://myapp.com. To achieve this, we need a Load Balancer.
Load Balancer Setup: In a typical setup, we would need to deploy a separate VM or machine as a Load Balancer and manually configure it to forward requests to any of the Kubernetes nodes' IPs. This can be a tedious task, especially in on-premises environments.
Cloud Platform Integration: However, if we are running our Kubernetes cluster on a supported Cloud Platform like Google Cloud Platform (GCP), Kubernetes offers built-in integration with the cloud platform's native load balancing functionalities.
Kubernetes and Cloud Platform Integration: When we create a "LoadBalancer" type service in Kubernetes, Kubernetes automatically sets up the load balancer for us in the cloud platform. It creates a Load Balancer VM and configures it to forward external requests coming to the load balancer's IP (e.g., http://myapp.com) to any of the IPs of the Kubernetes nodes where our application is running.
DNS Configuration: We can then configure our organization's DNS to point to the Load Balancer's IP. So, when users access http://myapp.com, their requests are automatically balanced and forwarded to the appropriate Kubernetes node running the application.
So, the LoadBalancer service type in Kubernetes allows us to provide a single URL for users to access our application, and Kubernetes automates the setup of the load balancer on supported cloud platforms, making it easier to manage and access our application at scale.
apiVersion: v1
  kind: Service
  metadata:
    name: redis-service
  spec:
    type: LoadBalancer
    selector:
      app: redis
    ports:
      - protocol: TCP
        port: 6379
        targetPort: 6379
Imp Commands
To create the Service file:
kubectl create -f service-definition.yml
To get list of services created:
kubectl get services
To get more information about service:
kubectl describe service <service-name>
To get the URL for running service:
minikube service <service-name> --url

Concept of Endpoints in Services
In Kubernetes, endpoints are like addresses that connect a service to its underlying pods. When you create a service, Kubernetes automatically creates and manages endpoints for that service.
Imagine you have a service that groups together several pods, like a backend service. The service acts as a single entry point for other parts of your application to access the backend. The endpoints, in this case, are the individual IP addresses of the pods that belong to the backend service.
Endpoints allow the service to know where to forward incoming requests. For example, if you have three pods running your backend, the service will have three endpoints, each pointing to one of those pods. When another part of your application wants to communicate with the backend service, it sends its request to the service's IP, and the service knows to forward the request to one of the endpoints (one of the backend pods) randomly or using a specific load balancing algorithm.
In simple terms, endpoints are the actual destinations (IP addresses) of the pods that a service manages, and they enable seamless communication between different parts of your application.
To check no. of Endpoints run the command kubectl describe service <service-name>
Learning by doing
Challenges with Basic Setup: Previously, we learned to deploy basic pods and services, but this approach has limitations. It doesn't allow easy scaling of the application, and if a pod fails, it won't automatically recover or deploy a new pod.
Introducing Deployments: To overcome these challenges, we will now use "Deployments" in Kubernetes. Deployments are a more advanced and convenient way to manage pods. They automatically create and manage "ReplicaSets" (a group of identical pods) and allow features like scaling, rolling updates, and rollbacks.
Improving Front-end Applications: We will focus on the front-end applications named "voting-app" and "result-app." Instead of having them on separate nodes, we will use Deployments to have three replicas of each application running on different nodes.
Need for Load Balancer: Now, if you want users to access these applications with a single URL like "example-vote.com" or "example-result.com," you need a Load Balancer. It would route the user's requests to the appropriate nodes and pods serving the application.
Manual Load Balancer (On-premises Setup): In a non-cloud environment like VirtualBox, you could create a separate virtual machine and install and configure a suitable load balancer like HAProxy or NGINX on it. This load balancer would then handle the traffic routing to the underlying nodes and pods.
Automated Load Balancer (Cloud Platform Setup): On supported cloud platforms like Google Cloud, Kubernetes can automatically set up a native load balancer for you. You just need to set the Service Type for the front-end services to "LoadBalancer," and Kubernetes handles the rest. This creates a Load Balancer VM and configures it to forward external requests to the appropriate nodes and pods, providing a single URL for users to access the application.
So, using Deployments in Kubernetes helps manage and scale pods effectively. For load balancing, you can manually set up a load balancer Service in a non-cloud environment or use Kubernetes' automated load balancer integration on supported cloud platforms like Google Cloud. The end goal is to provide users with a single URL to access your application, making it more user-friendly and scalable.
Certification Tip
Creating and editing YAML files in the CLI can be tricky, especially during the exam when copying and pasting might not work smoothly. A helpful approach is to use the kubectl run command, which can generate YAML templates for you. In some cases, you might even be able to use kubectl run without needing a YAML file.
Here's a set of useful commands with examples to remember for your practice and the exam:
Create an NGINX Pod:
kubectl run nginx --image=nginxGenerate a POD Manifest YAML file without creating it:
kubectl run nginx --image=nginx --dry-run=client -o yamlCreate a deployment:
kubectl create deployment --image=nginx nginxGenerate a Deployment YAML file without creating it:
kubectl create deployment --image=nginx nginx --dry-run=client -o yamlGenerate a Deployment YAML file, save it to a file, and make changes before creating the deployment:
kubectl create deployment --image=nginx nginx --dry-run=client -o yaml > nginx-deployment.yamlCreate a deployment with a specific number of replicas (Kubernetes 1.19+):
kubectl create deployment --image=nginx nginx --replicas=4 --dry-run=client -o yaml > nginx-deployment.yaml
Using these commands can simplify the process of creating and modifying resources, which can be very handy during the exam. Keep this reference page bookmarked for quick access: https://kubernetes.io/docs/reference/kubectl/conventions/

Namespaces
Throughout this course, we've been working with various Kubernetes objects like Pods, ReplicaSet, Deployments, and Services. All of these activities have been taking place within a "namespace."
Think of a namespace as a segregated section within your Kubernetes cluster. The default namespace is created automatically during the initial setup of Kubernetes.
By default, when you use commands like kubectl get pods, you're operating within the default namespace. But you can also create your own custom namespaces.
For example, you can list pods in the default namespace like this:
$ kubectl get pods
Or if you're interested in another namespace, you can use the --namespace flag:
$ kubectl get pods --namespace=kube-system
When you create a Pod using a definition file, like the one shown below, it's created within the default namespace:
apiVersion: v1
kind: Pod
metadata:
  name: myapp-pod
  labels:
    app: myapp
    type: front-end
spec:
  containers:
    - name: nginx-container
      image: nginx
However, if you'd like to consistently create a Pod in a specific namespace, you can include the namespace field within the definition file:
apiVersion: v1
kind: Pod
metadata:
  name: myapp-pod
  namespace: dev
  labels:
    app: myapp
    type: front-end
spec:
  containers:
    - name: nginx-container
      image: nginx
To create a new namespace, you can either define a Namespace object in a YAML file and run kubectl create -f, like so:
apiVersion: v1
kind: Namespace
metadata:
  name: dev
Or you can simply run:
$ kubectl create namespace dev
If you want to work consistently within a particular namespace, you can set it as the default:
$ kubectl config set-context $(kubectl config current-context) --namespace=dev
For a broader view of pods across all namespaces, you can use:
$ kubectl get pods --all-namespaces
If you wish to limit resources within a namespace, you can define a ResourceQuota object in a YAML file and create it:
apiVersion: v1
kind: ResourceQuota
metadata:
  name: compute-quota
  namespace: dev
spec:
  hard:
    pods: "10"
    requests.cpu: "4"
    requests.memory: 5Gi
    limits.cpu: "10"
    limits.memory: 10Gi
Then create it using:
$ kubectl create -f compute-quota.yaml
Namespaces provide a way to organize and manage your Kubernetes resources more efficiently and effectively.
Imperative VS Declarative Commands
Imperative Commands: Let's say you're asking someone to build a sandcastle on the beach. You would give them step-by-step instructions like "Take a bucket of sand, turn it upside down, and pat it to create the base." Then, "Add another layer, shape the towers, and decorate with seashells."
In computing terms, imperative commands are like giving specific instructions on each step. You're telling the computer exactly what to do, step by step. For example, with Kubernetes, an imperative command might be: "Create a Pod named 'webapp' with the image 'nginx' and expose it on port 80."
Declarative Commands: Now, let's say you give someone a blueprint of a sandcastle and say, "Build the sandcastle according to this blueprint." The blueprint has all the details, like the shape, towers, and decorations. You don't need to explain each step – they follow the plan.
In computing, declarative commands work similarly! You provide a configuration file (like a blueprint) of what you want, and the system figures out how to make it happen.
To Sum It Up:
Imperative: Giving specific, detailed instructions step by step, just like building a sandcastle by explaining every action.
Declarative: Providing a description or plan, like a blueprint, and letting the system figure out how to make it happen.
In the world of Kubernetes, both approaches have their uses. Imperative commands can be helpful for quick actions or one-time tasks, while declarative commands are great for describing the desired state of your applications and letting Kubernetes manage them accordingly. But Imperative actions are not logged, hence it recommended to go with the declarative way . But for CKA you need to learn quick handy imperative commands too!
Certification Tips – Quick Tasks with Imperative Commands in kubectl
Even though you'll mostly work with declarative methods using definition files, imperative commands can be useful for accomplishing one-time tasks efficiently and generating templates. These tips can save valuable time during your exams.
Before diving in, understand these two options that will be handy with the following commands:
--dry-run: When you run a command, it usually creates the resource. To test without actually creating, use --dry-run=client. This checks if the command is correct and if the resource can be created.
-o yaml: This outputs the resource definition in YAML format on the screen.
Combine these two to quickly generate a resource definition file that you can modify and create resources as needed, avoiding starting from scratch.
POD
Create an NGINX Pod:
kubectl run nginx --image=nginx
Generate a POD Manifest YAML file without creating it (using --dry-run):
kubectl run nginx --image=nginx --dry-run=client -o yaml
Deployment
Create a deployment:
kubectl create deployment --image=nginx nginx
Generate a Deployment YAML file without creating it (using --dry-run):
kubectl create deployment --image=nginx nginx --dry-run=client -o yaml
Generate a Deployment with 4 Replicas:
kubectl create deployment nginx --image=nginx --replicas=4
You can also scale a deployment using the kubectl scale command:
kubectl scale deployment nginx --replicas=4
An alternative is to save the YAML definition to a file and modify it:
kubectl create deployment nginx --image=nginx --dry-run=client -o yaml > nginx-deployment.yaml
Then update the YAML file with the desired fields before creating the deployment.
Service
Create a ClusterIP Service named redis-service to expose pod redis on port 6379:
kubectl expose pod redis --port=6379 --name redis-service --dry-run=client -o yaml
Or create a NodePort Service named nginx to expose pod nginx’s port 80 on port 30080:
kubectl expose pod nginx --type=NodePort --port=80 --name=nginx-service --dry-run=client -o yaml
Remember, while both commands have their limitations, 'kubectl expose' is recommended. If you need to specify a node port, generate a definition file with this command and manually input the node port before creating the service.
Reference Links: